How To Select Printable Area In Excel
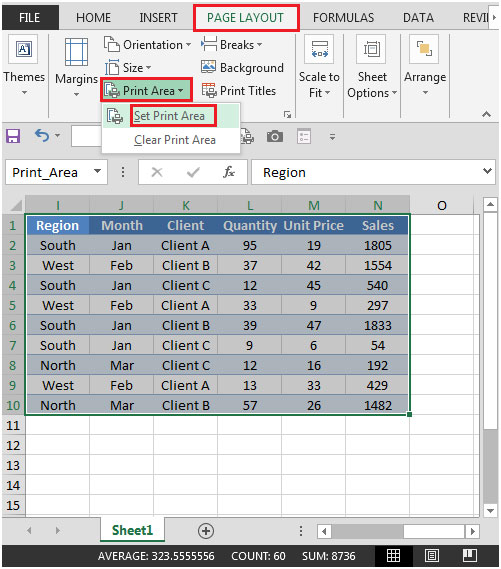
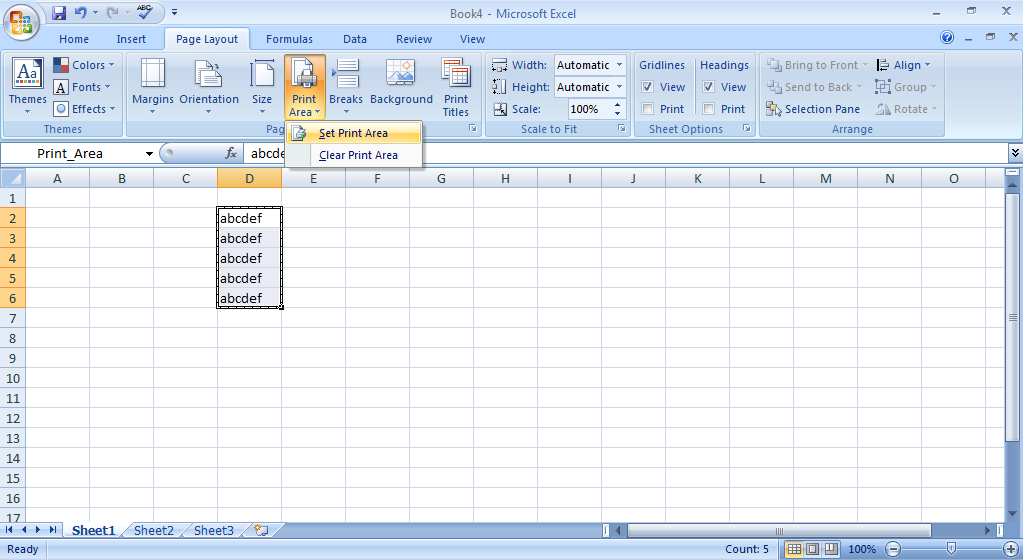
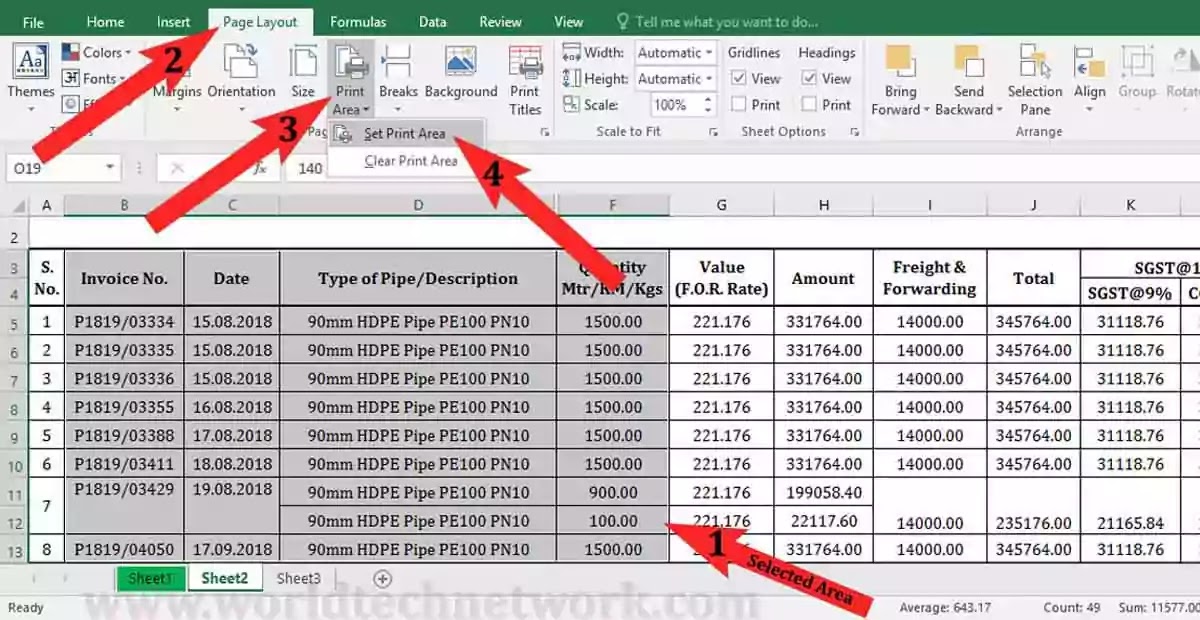
How To Select Printable Area In Excel - The preview will now show only the selected area. The selected area will be. Web today we’ll be talking about how to set the print area in excel. Web print select areas of excel spreadsheets start by opening the excel spreadsheet you need, hold down the ctrl key and highlight the area of the document. Once a print area is set, add additional print areas by selecting. Web select the cells you want to print. Click on print are button. Web to set a single print area, select the cells. Go to page layout tab. Choose set print area. hit enter or return on your keyboard to set the print area.
Click the page layout tab. Web to set a single print area, select the cells. Web click on the print area button in the top menu. Web when you press ctrl + p on your keyboard, you’ll get a print preview this shows you that only the print area you’ve set will be printed. Now, inside the page layout tab, click the print area and. Follow the instructions below to do so. Web see the steps to modify the print area: Web to set the print area in excel, first select the cells you want to print. Each print area will print as a separate. The selected area will be.
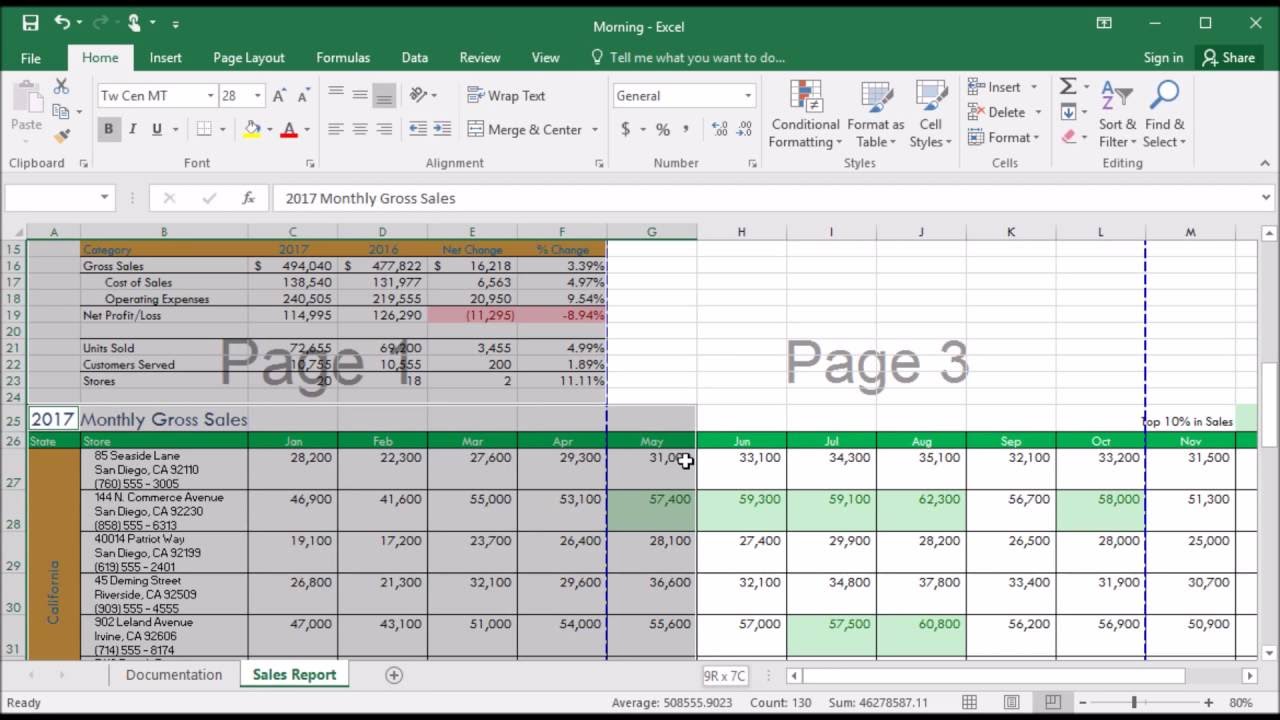
The cells that you select don't have to be next to the existing print area. Web how to show print area in excel (4 easy methods) zehad rian jim may 17, 2023 0 get free advanced excel exercises with solutions! Web add cells to an existing print area. Web to set the print are, do as follows: In the page setup group, click print area and then click set. Web print select areas of excel spreadsheets start by opening the excel spreadsheet you need, hold down the ctrl key and highlight the area of the document. Web basic approach to print selected area in excel this is the most typical method for printing a specific area. Web one of excel's essentials, the set print area feature lets you specify the exact cells to be printed. Web click the list arrow for the print area settings and then select the “print selection” option. Keep watching and print any part of your excel sheet without a hitch!
Identifying and Selecting the Print Area in a Sheet in Excel 2010
Web select the cells you want to print. Once a print area is set, add additional print areas by selecting. Web when you press ctrl + p on your keyboard, you’ll get a print preview this shows you that only the print area you’ve set will be printed. Web basic approach to print selected area in excel this is the.
233 How to set print area in Excel 2016 YouTube
Follow the instructions below to do so. Select the new cells you want to add in the existing print area. Web today we’ll be talking about how to set the print area in excel. The preview will now show only the selected area. Select the cells that you want to add to the existing print area.
Ravi's Online Diary How to Set Print Area in excel?
Web today we’ll be talking about how to set the print area in excel. The preview will now show only the selected area. Keep watching and print any part of your excel sheet without a hitch! Go to page layout tab. Web see the steps to modify the print area:
How to Select Print Area in MS Excel एक्सेल में प्रिंट एरिया सिलेक्ट
The example sheet that we walk through in this tutorial has 2. Web click the list arrow for the print area settings and then select the “print selection” option. Web add cells to an existing print area. Web to set the print are, do as follows: Web one of excel's essentials, the set print area feature lets you specify the.

How to set Print Area in Excel YouTube
Then, click the page layout tab on the ribbon. Follow the instructions below to do so. The cells that you select don't have to be next to the existing print area. Web to set the print area in excel, first select the cells you want to print. Web today we’ll be talking about how to set the print area in.

How to Clear a Print Area in Excel for Office 365 Support Your Tech
Once a print area is set, add additional print areas by selecting. Web add cells to an existing print area. Web see the steps to modify the print area: The example sheet that we walk through in this tutorial has 2. Keep watching and print any part of your excel sheet without a hitch!
:max_bytes(150000):strip_icc()/ExcelSetPrintArea-5c23d199c9e77c0001adc722.jpg)
How to Set Print Area in Excel
Select the area that you wish to print. Web how to show print area in excel (4 easy methods) zehad rian jim may 17, 2023 0 get free advanced excel exercises with solutions! Select the cells that you want to add to the existing print area. Web when you press ctrl + p on your keyboard, you’ll get a print.
How to set a print area in Microsoft Excel to print a specific section
Don’t miss out a great. Now, inside the page layout tab, click the print area and. In the page setup group, click print area and then click set. Web click on the print area button in the top menu. Web to set the print area in excel, first select the cells you want to print.

How to Select Print Area in MS Excel एक्सेल में प्रिंट एरिया सिलेक्ट
Set a new print area you can add a new print area in your worksheet from the page layout tab in the menubar. Now, inside the page layout tab, click the print area and. Select the area that you wish to print. Then, click the page layout tab on the ribbon. Click on print are button.
:max_bytes(150000):strip_icc()/ExcelClearPrintArea-5c1c287ac9e77c000159666f.jpg)
How to Set Print Area in Excel
Select the cells that you want to add to the existing print area. Set a new print area you can add a new print area in your worksheet from the page layout tab in the menubar. Web when you press ctrl + p on your keyboard, you’ll get a print preview this shows you that only the print area you’ve.
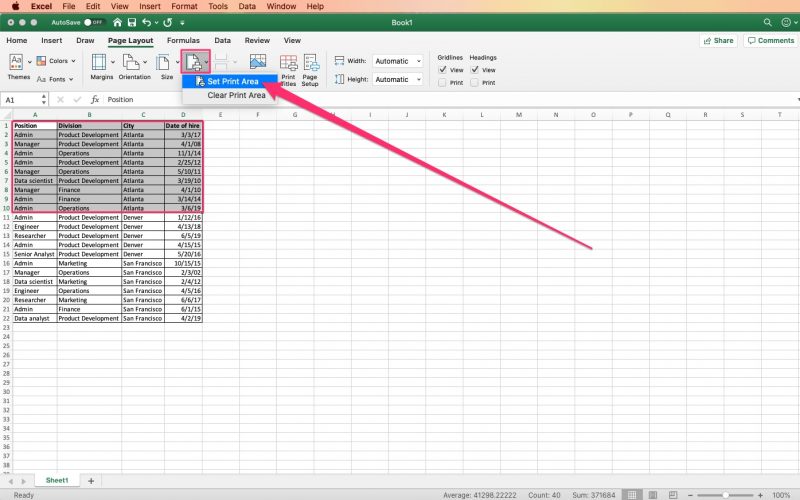
Go To Page Layout Tab.
Don’t miss out a great. The selected area will be. Click the page layout tab. Web click the list arrow for the print area settings and then select the “print selection” option.
Click The Print Area Button.
Keep watching and print any part of your excel sheet without a hitch! Then, click the page layout tab on the ribbon. Now, inside the page layout tab, click the print area and. Select the new cells you want to add in the existing print area.
Web Add Cells To An Existing Print Area.
Web see the steps to modify the print area: Follow the instructions below to do so. Web to set the print area in excel, first select the cells you want to print. Web click on the print area button in the top menu.
Web When You Press Ctrl + P On Your Keyboard, You’ll Get A Print Preview This Shows You That Only The Print Area You’ve Set Will Be Printed.
Once a print area is set, add additional print areas by selecting. Each print area will print as a separate. Select the cells that you want to add to the existing print area. The cells that you select don't have to be next to the existing print area.